Talking to model engineers, the reasons why more of us have not yet taken up CNC become clearer. Cost is a factor, but another big reason is more subtle, and boils down to doubt surrounding the combination of two very different technologies. The mechanics of CNC and conventional machines are very similar, and as with other home workshop machines, we could expect the working life to be – well, as long as we need in any event. No such confidence attaches to the electronics, computer or software systems, and it has to be acknowledged there is a life-expectancy mismatch here. As engineers we can probably solve any mechanical problems, but the electronics may well soon be obsolete with no guarantee of maintainability into the future. What can be done with a pristine CNC machine with useless, irrepairable electronics? We could throw out the electronics and start again. Using modern, low cost, accessible electronics, this is nowhere near as difficult as it sounds, nowhere near as difficult as it once was!
Mach3 CNC software running on a PC under Microsoft Windows has been the mainstay of hobby and small user CNC in recent years. At time of writing, Mach4, the successor to Mach3, has been long promised but has yet to appear. It's not that there's anything much wrong with Mach3, it is on the whole an excellent software tool, however the whole 'PC / Microsoft Windows' platform upon which it relies, is a moving target. The 'LPT' parallel printer port, the sensible Mach3 method of choice for connecting machine to computer, has been phased out and given way to USB, which is not designed for time-critical application such as machine control. Every 'Windows update' threatens new compatibility problems. This is particularly unfair on smaller software suppliers who may lack the resource to keep re-working products in line with changes thrust upon them at the whim of the Microsoft Corporation. Perhaps the writing has been on the wall for some time. To quote from the Mach3 documentation: “Mach3 is not a simple program. It takes great liberties with Windows in order to perform its job; this means it will not work on all systems due to many factors.”
Commercial imperative continues to move the PC further from its serious IBM 'Business Machine' origins, towards being a disposable domestic item. A radical question maybe, but is it time to think about rejecting the 'Windows / PC' platform and finding something better?
Can We Design Our Own CNC Control System ? – An Experiment
Once upon a time designing our own control system would have been a huge undertaking involving design of electronic circuits and circuit boards, requiring a specialist skill set, costing a fortune, and taking a long time. However there's no need to design a whole new system from scratch these days. There are a number of very inexpensive computer and controller development kits on the market, some of which when hooked together, could be made to serve our purpose very well. This would leave us the task of programming – telling these boards what we want them to do – but this has also been made a lot easier than it once was.
Any large task becomes more manageable when analysed and broken down into a number of smaller tasks. In this experiment the starting point was in noting that some events have particularly tight and precise timing requirements, while others do not. Driving a number of stepper or servo motors simultaneously moving multiple axes at different speeds in a coordinated fashion would seem to be 'time critical', requiring timing accuracy measured perhaps in micro seconds. For everything else timing, while still important, may be far more relaxed. With this one thought, the computer hardware monolith has been broken into two simpler sub-systems, one dealing with time critical events, the other the rest.
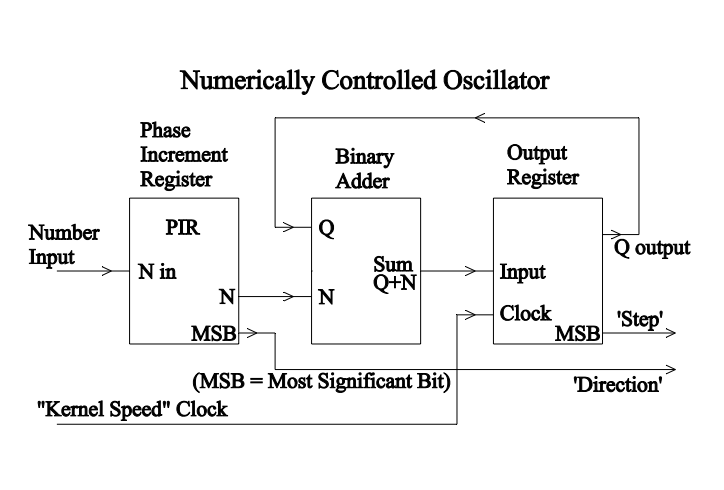
Fig 39 - Numerically Controlled Oscillator
The time-critical sections were then analysed further, and some research uncovered the 'Numerically Controlled Oscillator' (NCO). This is a remarkably simple and elegant device, a simplified block diagram is shown in Fig 39. However, for our purposes the NCO can be thought of as a 'Black Box' which takes some number 'N' as input and produces as output a continuous regular pulse stream of 'kN' pulses per second, where 'k' is a constant. 'N' may be positive or negative to produce the same output, and by providing an additional output signal determined by the sign of 'N', we have two output signals which could be named 'Step' and 'Direction'. These are, by no coincidence, exactly those needed to drive standard stepper or servo motor drive systems which typically cause a small, precise angular rotation in response to each 'Step' pulse. The NCO thus enables us to run a motor at a precise speed in either direction, and responsibility for timing accuracy falls to the NCO. Critical to its operation is a regular 'clock' signal, the heart-beat of the system which in Mach3 is called the 'Kernel Speed' clock. Briefly, the adder and output register form a kind of counter which counts up (or down) by 'N' on every pulse of 'Kernel Speed'. The larger the 'N', the more often the counter goes 'round the clock', or 'overflows'. This 'going round the clock' signal is the 'Step' output. A detailed account of NCOs may be found at www.jons-workshop.com
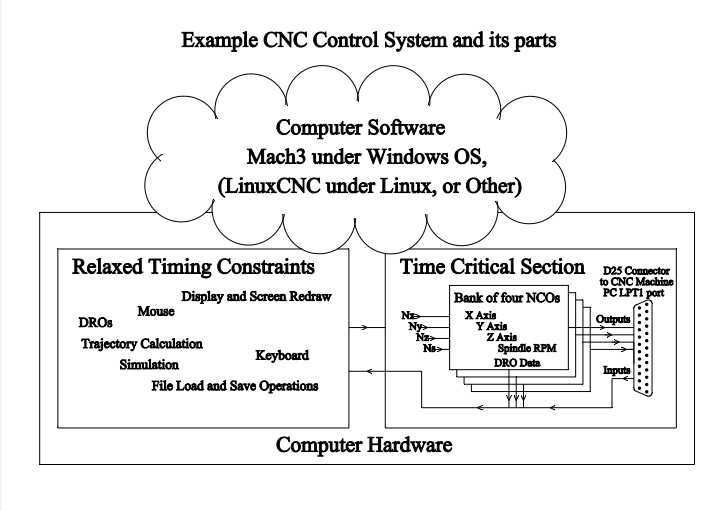
As another design requirement, the 'LPT' parallel printer port of the old PC was good for connecting to CNC. Our replacement should emulate this 'LPT' port. The simplified system diagram of Fig 40 illustrates the thinking this far.
Fig 40 - Example CNC Control System and its parts
Computer and Controller Development Kits
In recent times there has been a revolution in electronics with many low cost programmable micro-controllers and mini-computers now available. Designed for use by the non-technical, they have been made as easy to use as possible. Computer and controller systems are essentially similar. They will comprise a printed circuit board fitted with some central processor chip and sufficient other components to provide a system we can easily connect to the outside world, and configure to do something useful. As a general distinction a controller product comes with no software, that is to say it can do nothing at all until you programme it to do something. A computer, on the other hand, may come with some operating system software and connections ready for a keyboard, mouse, display, internet and so on. As another generalisation, a controller will be better for time-critical applications simply because it does not have all that other stuff to get in the way. A computer, on the other hand, is better suited to tasks needing easy access to keyboards, displays and the rest. It could be that our CNC controller ends up using one (or more) of each.
Micro-Controllers – 'Arduino' and more
Some micro-controller devices have been designed specifically for hobby and educational markets – builders of robots, alarms, home automation and all sorts, or simply for learning about modern technology. The most popular of these is probably the 'Arduino Uno', a low cost, simple to programme board about the size of a credit card. Many other micro-controller boards are available, many sold at prices 'below cost' and targeted at industrial design professionals, the aim being to encourage 'design-in' of their particular chip into the next generation of high-volume TV, smart-phone, tablet and so on. A step up the technology ladder from the entry-level 'Uno', controllers such as the 'Mbed LPC1768' have capability way beyond the Uno (as does the Arduino Due, and (at time of writing) 'coming soon' Arduino Tre).
All of these micro-controller products have a number of 'Input and Output' points for connection to switches, sensors, relays, motors or other elements of your intended system, and the manufacturers provide all the software tools needed for you to write, develop, and test your code. Some of us may have experimented in the past with 'PIC' chips, learning sets of cryptic 'assembler' codes and plugging chips into external programmers. These newer micro-controllers represent a next step. Cryptic codes have given way to a more natural 'plain English-like' coding language, your code uploaded to the chip at the click of a mouse. These type of micro-controller chips are all around us, in central heating boilers and controllers, washing machines, DVD players, TVs and remotes, phones, toys, electricity meters and more.
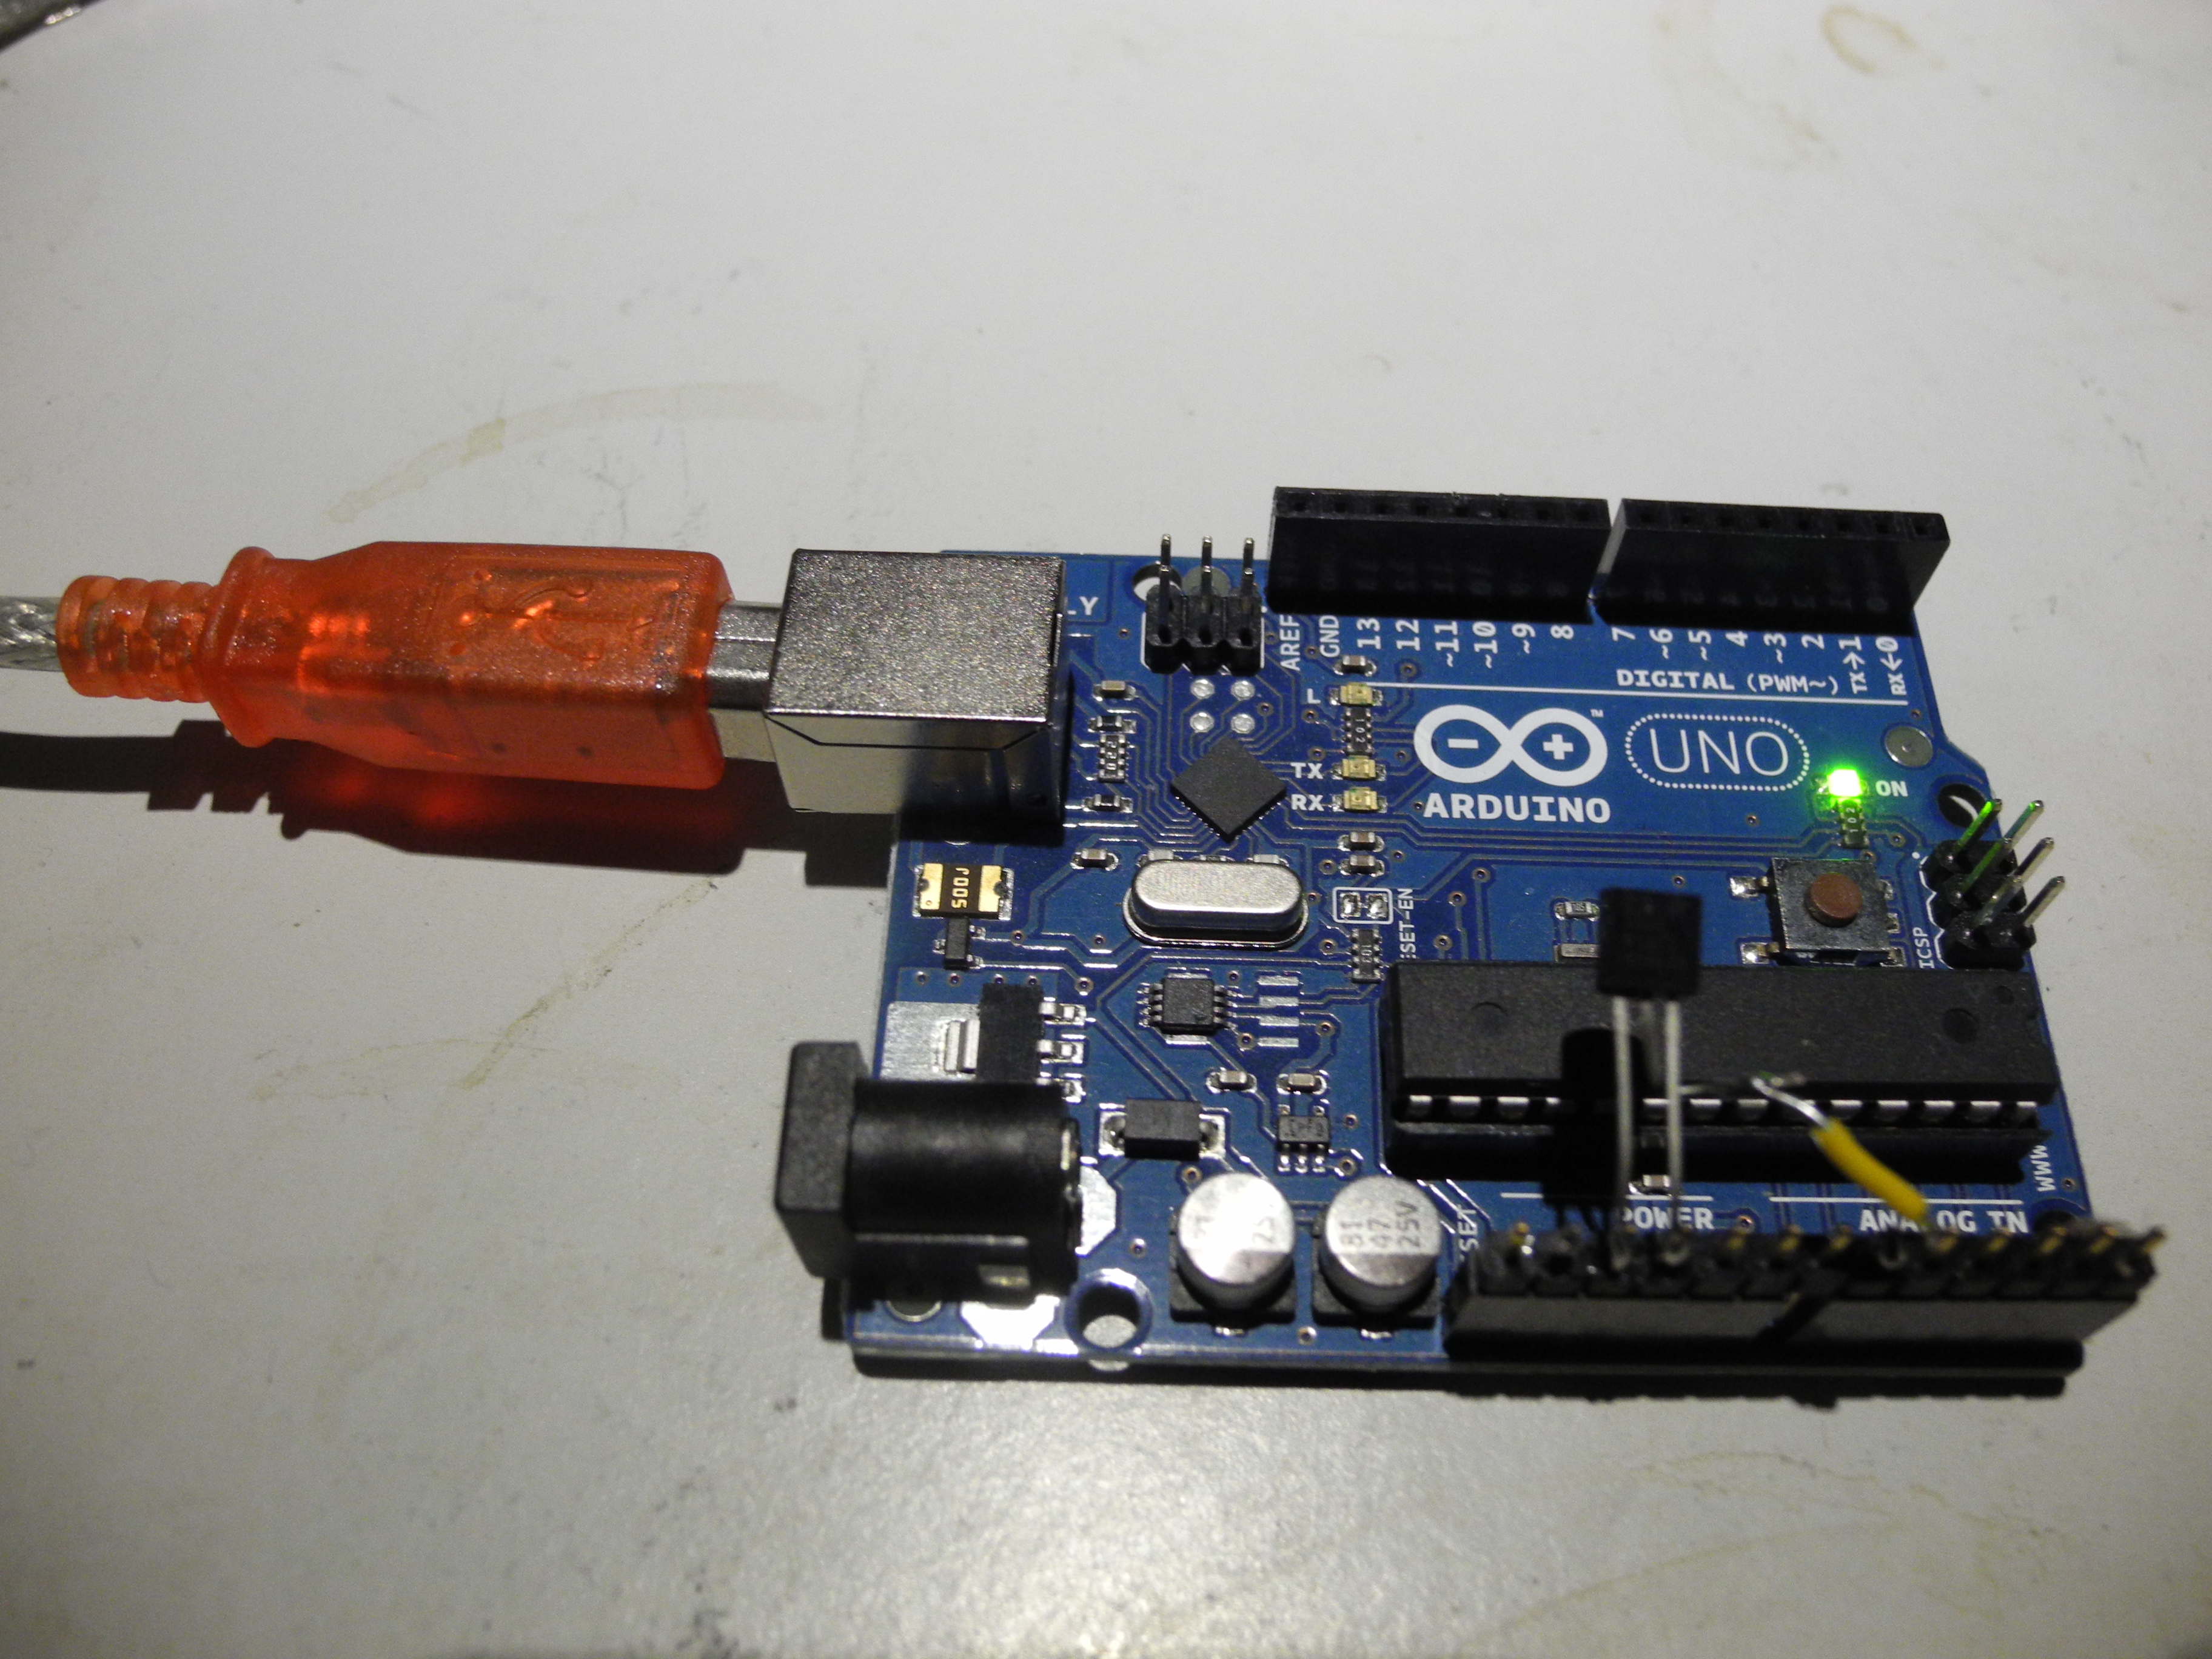
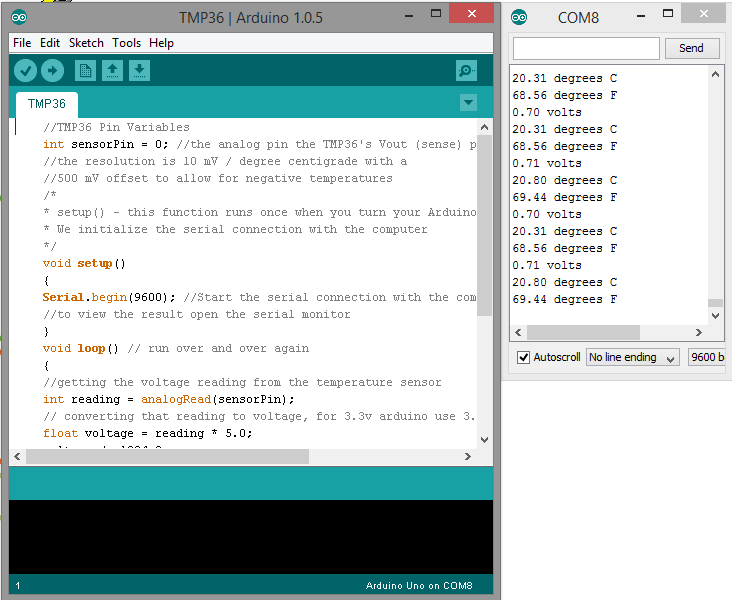
Fig 41 - Arduino Fig 42 - Arduino Temp Sensor
Fig 41 shows an Arduino Uno with a TMP36 temperature sensor wired to one of the analogue inputs. The red plug is the end of a USB lead connected to a PC which powers the Arduino, and Fig 42 shows two panels from the PC screen. The larger panel shows part of the programme (or 'sketch' as they say in Arduino), written to run on the Arduino using the Arduino design software (which takes almost no time to download and install). The temperature is read as a voltage from the sensor, calculation then transforms 'voltage' into temperature in both Centigrade and Farenheit, all three figures are sent to the PC and displayed in the rolling window headed 'COM8' in this example, and the process repeats once per second until the plug is pulled. An example such as this might be the second 'sketch' a novice user tries, the first being the supplied 'Blinky' sketch which continuously 'blinks' the on-board LED. Arduino is hugely popular, many web sites are out there packed with examples and help. The place to start is the official Arduino site at www.arduino.cc
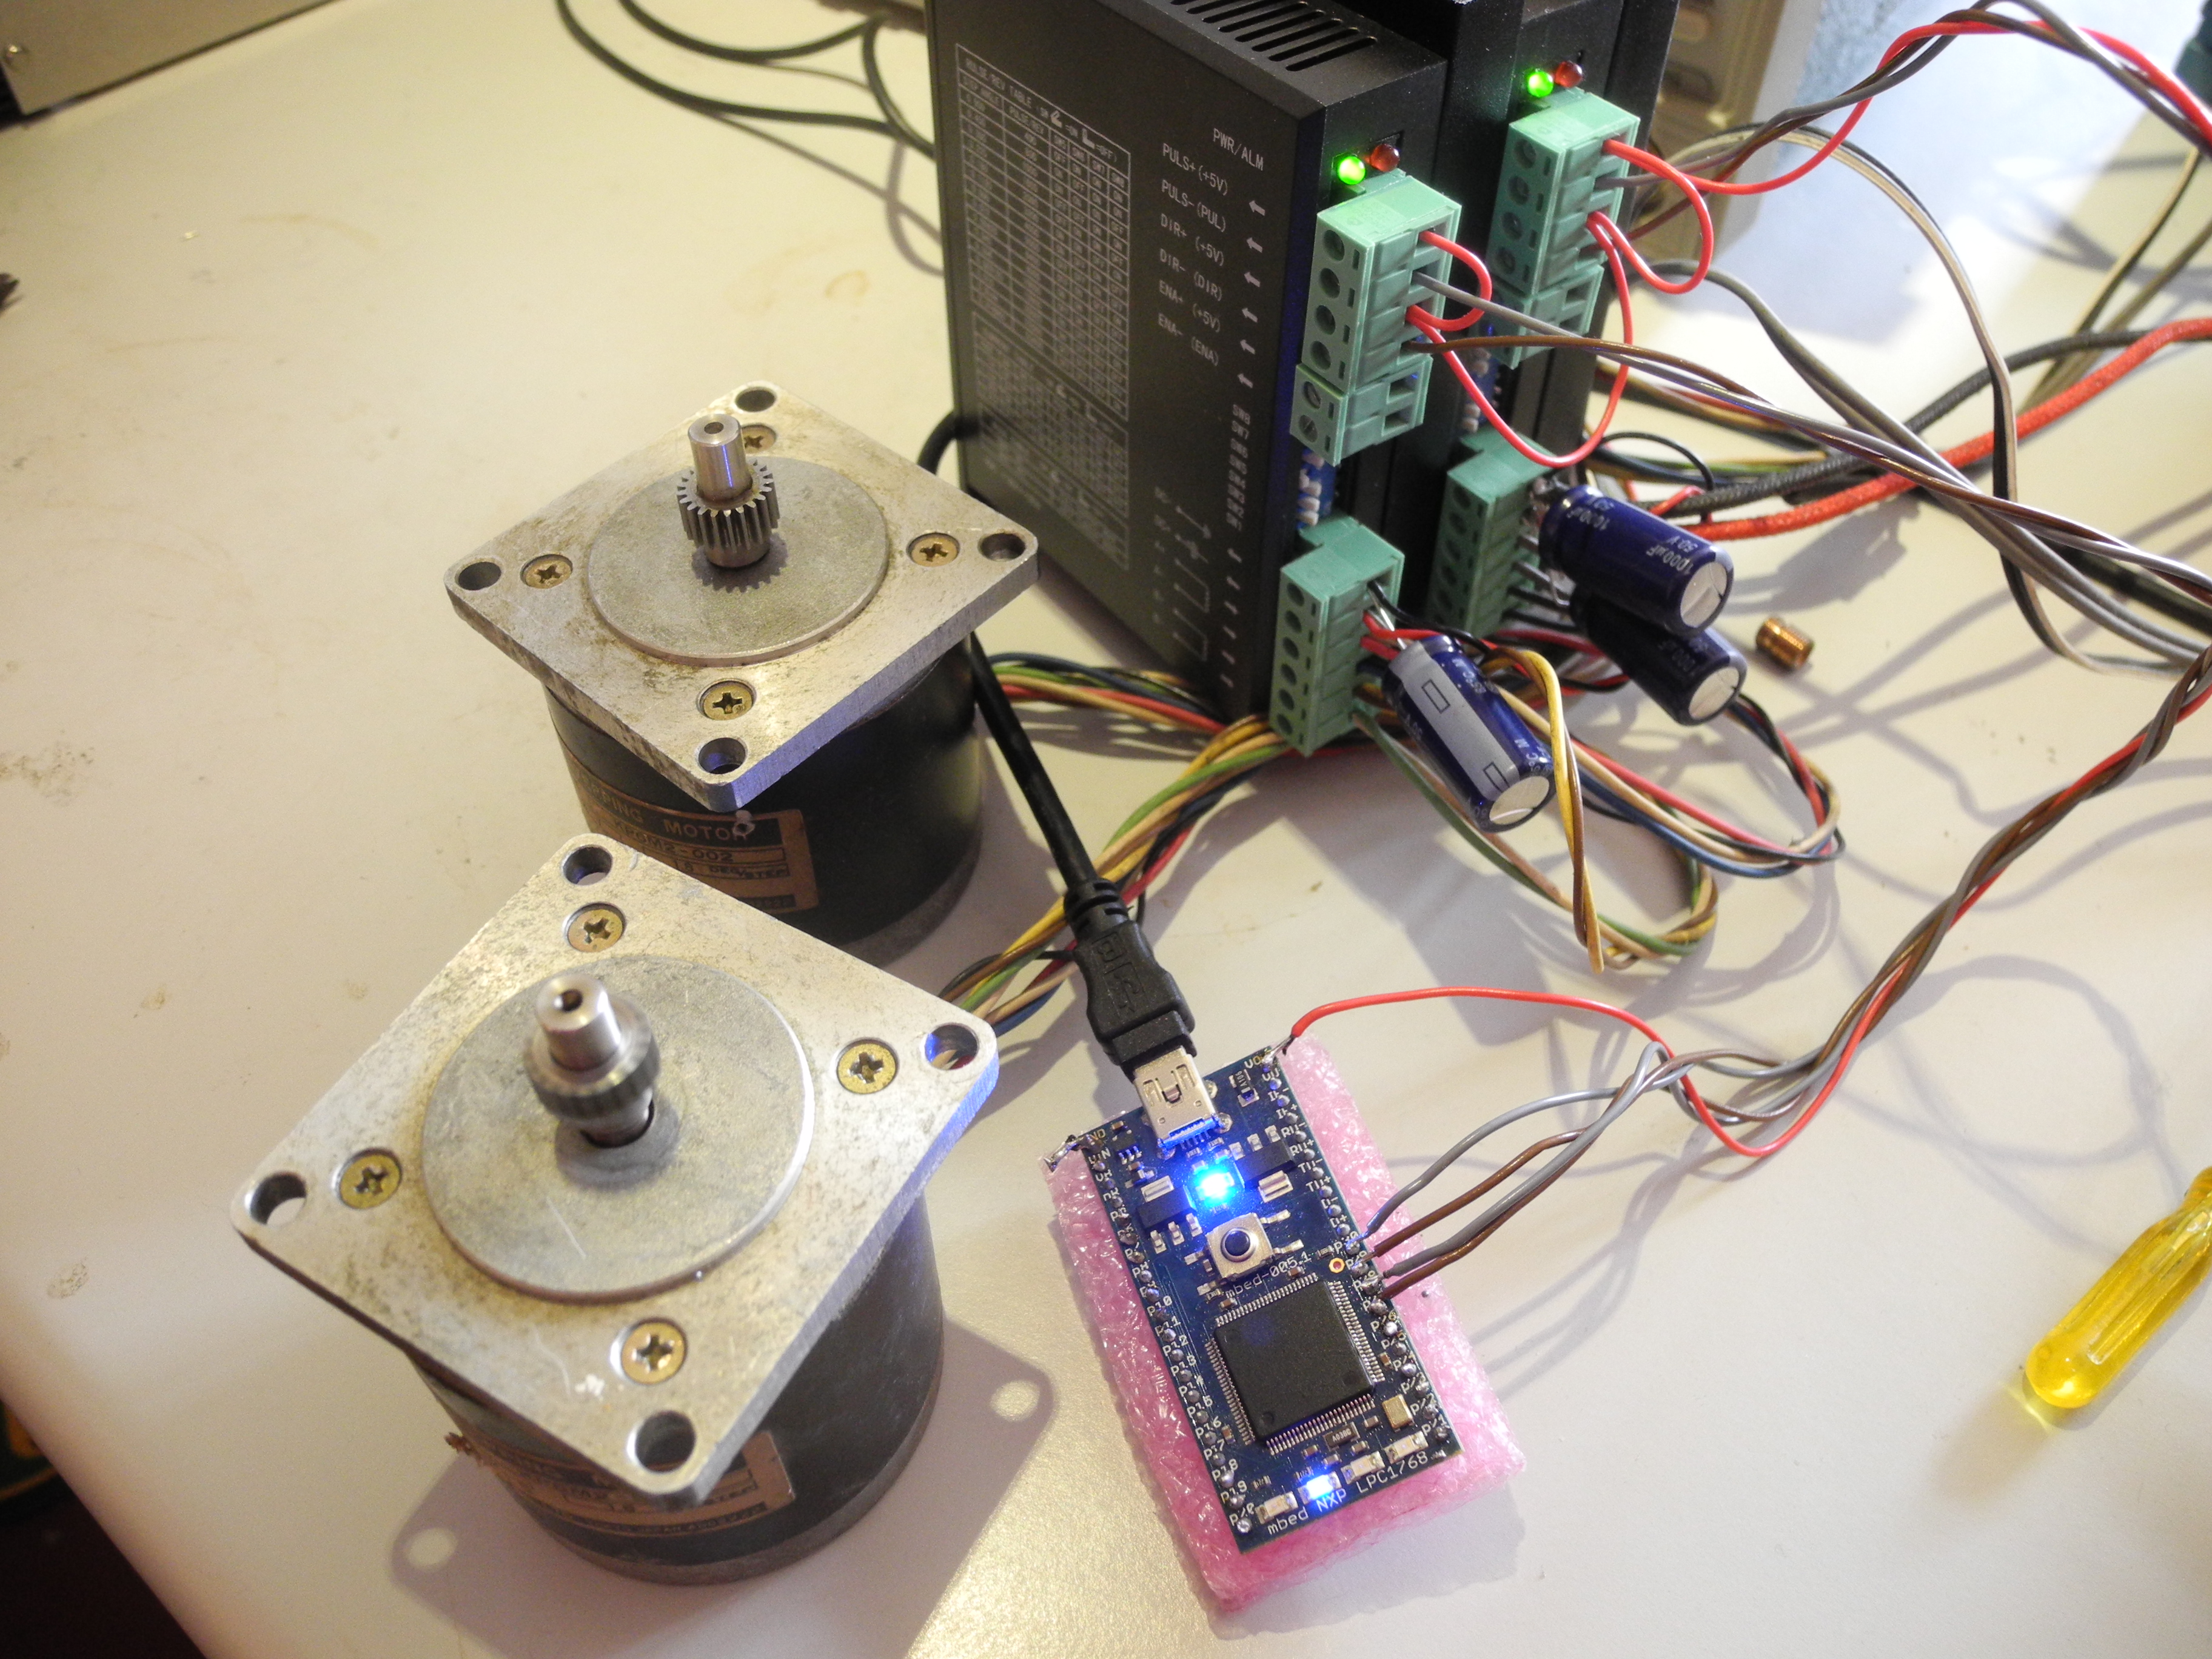
Fig 43 shows the Mbed LPC1768 controller driving a pair of stepper motor drivers (similar to those within the KX3 mill) and motors. As with the Arduino, the Mbed is powered via USB from a PC, the stepper motor drives are powered from a separate 30 volt power supply (not shown). There is nothing to download or install before using Mbed devices, everything is done online via the www.mbed.org web site (Fig 44), your files being kept on a server in Cambridge rather than on your PC. This is a brilliant idea and an excellent resource providing access to numerous software libraries, blogs, help, manuals – everything you need. Not long ago, a design suite like this would have cost money, and been out of date in no time. Mbed provide access to state of the art software tools, all at no cost. Mbed also supports a growing family of controller products from multiple manufacturers. Amongst the cheapest at around £10 is the KL25Z from Freescale, and the similar but newer KL46Z (£12). These are not as powerful as the original Mbed LPC1768 (around £40) but more capable than the entry level Arduino Uno (around £20).
Mini-Computers – 'Raspberry Pi' and more
A mini-computer differs from a micro-controller in that it has some 'operating system' software installed enabling it to readily connect to a keyboard, display, mouse and programme storage and filing system. One such, the 'Raspberry Pi' is a tiny, cheap computer which has really taken off, having sold more than two million units. It was designed in Cambridge and is produced in Britain by the Raspberry Pi Foundation, a charity set up for the purpose of promoting education about computing, not just how to use computers. It is widely supported, people of all ages are coming up with ingenious fun and serious applications. There are many add-on goodies to go with it including inexpensive video cameras and boards to interface to the outside world. Running the Linux operating system, the Pi connects to keyboard, mouse, display, the internet and more – this is a real computer. Online magazine The MagPi (www.themagpi.com/) is a good place to get some ideas, as well as the official Pi site www.raspberrypi.org. Another product in this group is the 'BeagleBone Black', also worth a look.
Controller and 'LPT' Port Implementation
Having decided to equip our controller with a PC LPT printer port lookalike 25 pin connector, the KX3 machine is easily swapped between the old Mach3 / PC combo and whatever we come up with. This required a number of signals designated as 'Inputs' or 'Outputs'. A total of eleven pins are outputs, five are inputs. Of the outputs, there are five each 'Step' and 'Direction' signals. These cover the real axes X, Y and Z, the 'spare' A axis which could be used as a rotary axis, and a 'Step / Direction' pair for the spindle motor as this works in a similar way. The eleventh output is called the 'charge pump'. This is a line which must be continuously driven with a high / low repeating signal. If this stops, the KX3 'assumes' our control computer has crashed and disables everything for safety. Of the five inputs, one is wired to the Emergency Stop switch, three others are assigned to physical limit switches on the X Y and Z axes.
As another design requirement – our solution should work on a number of different platforms. This was to safeguard our time investment against any one disappearing from the market. After some consideration, work commenced coding for the three short-listed devices; the Mbed LPC1768, and the Freescale KL25Z and the KL46Z. The coding language is 'C' or 'C++' (pronounced 'See', and 'See plus plus'), and after some work we had a system showing promise on all three. The NCOs were implemented in software, and further code was written enabling the controller to recognise and execute some of the simpler 'G Code' instructions. Connected to a terminal programme on the PC ('PuTTY' is one such), the controller became usable as a virtual CNC machine in 'Manual Data Input' (MDI) mode. Further, plugging the controller into the KX3 CNC mill showed the controller really was capable of driving the KX3 milling machine! Code was written to enable setting the spindle speed, the feed rate, and executing the four most useful G codes; G0 rapid and G1feed rate straight moves, as well as G2 and G3 arc clockwise and anti clockwise.
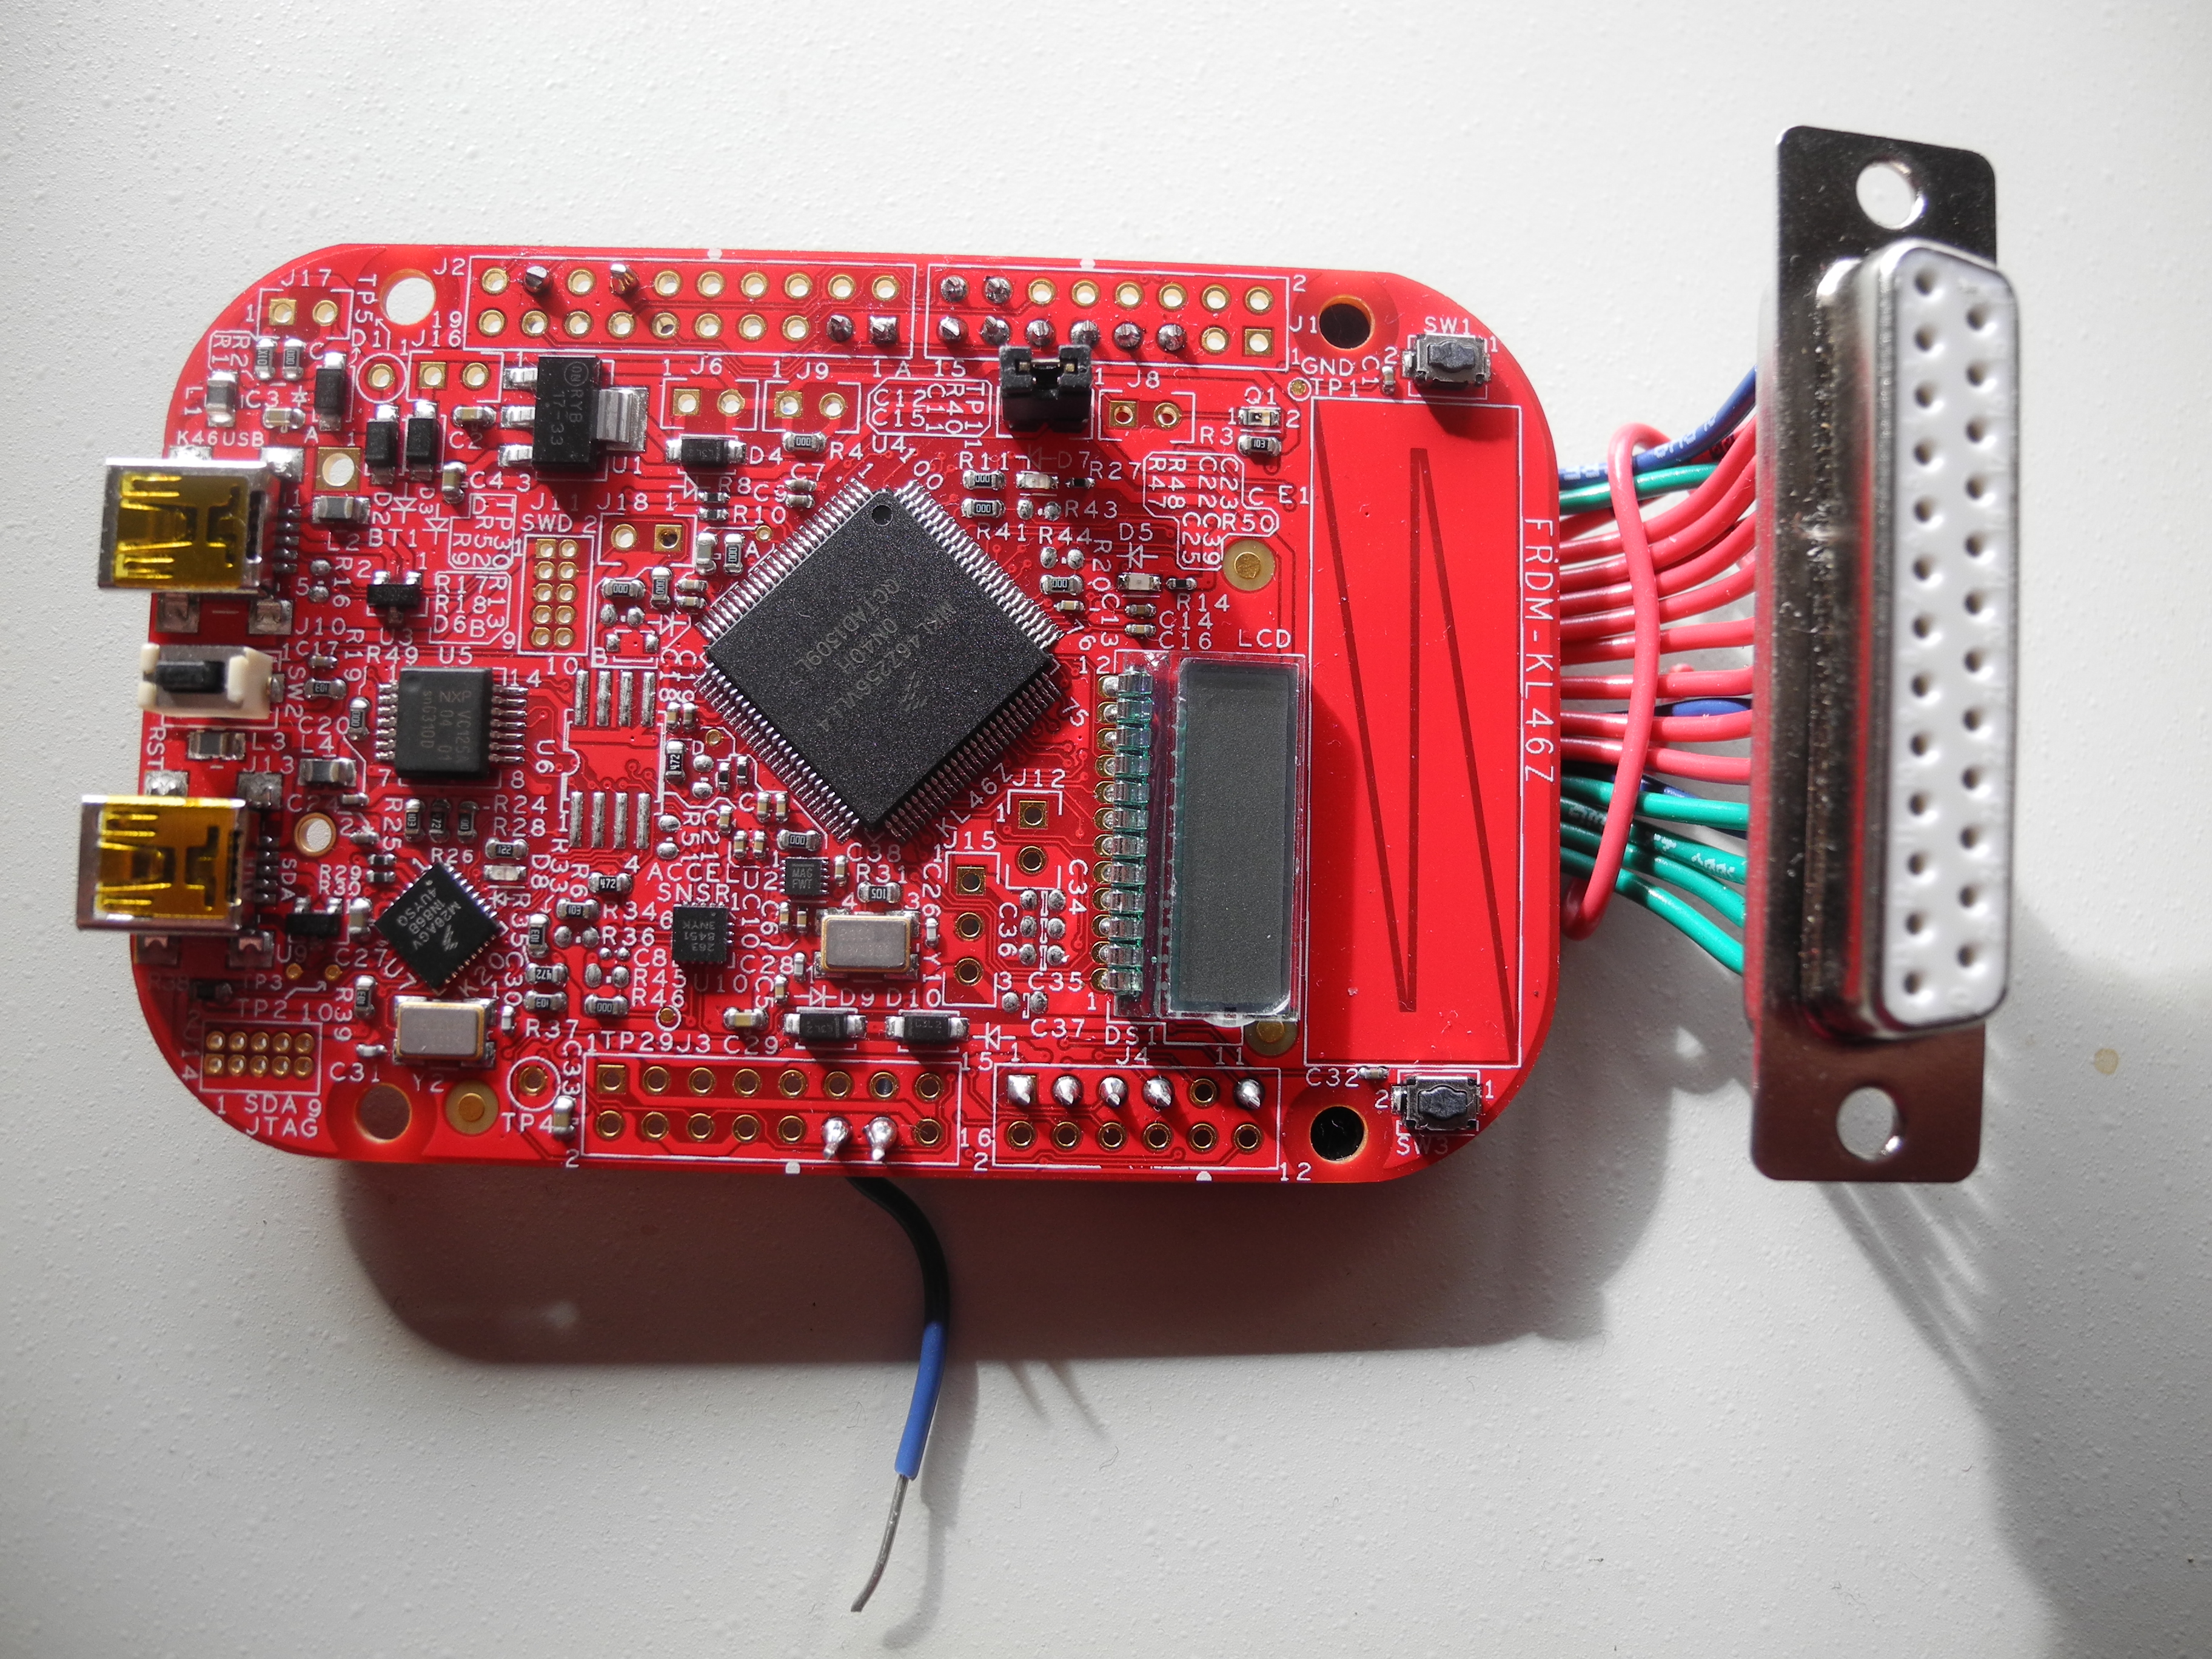
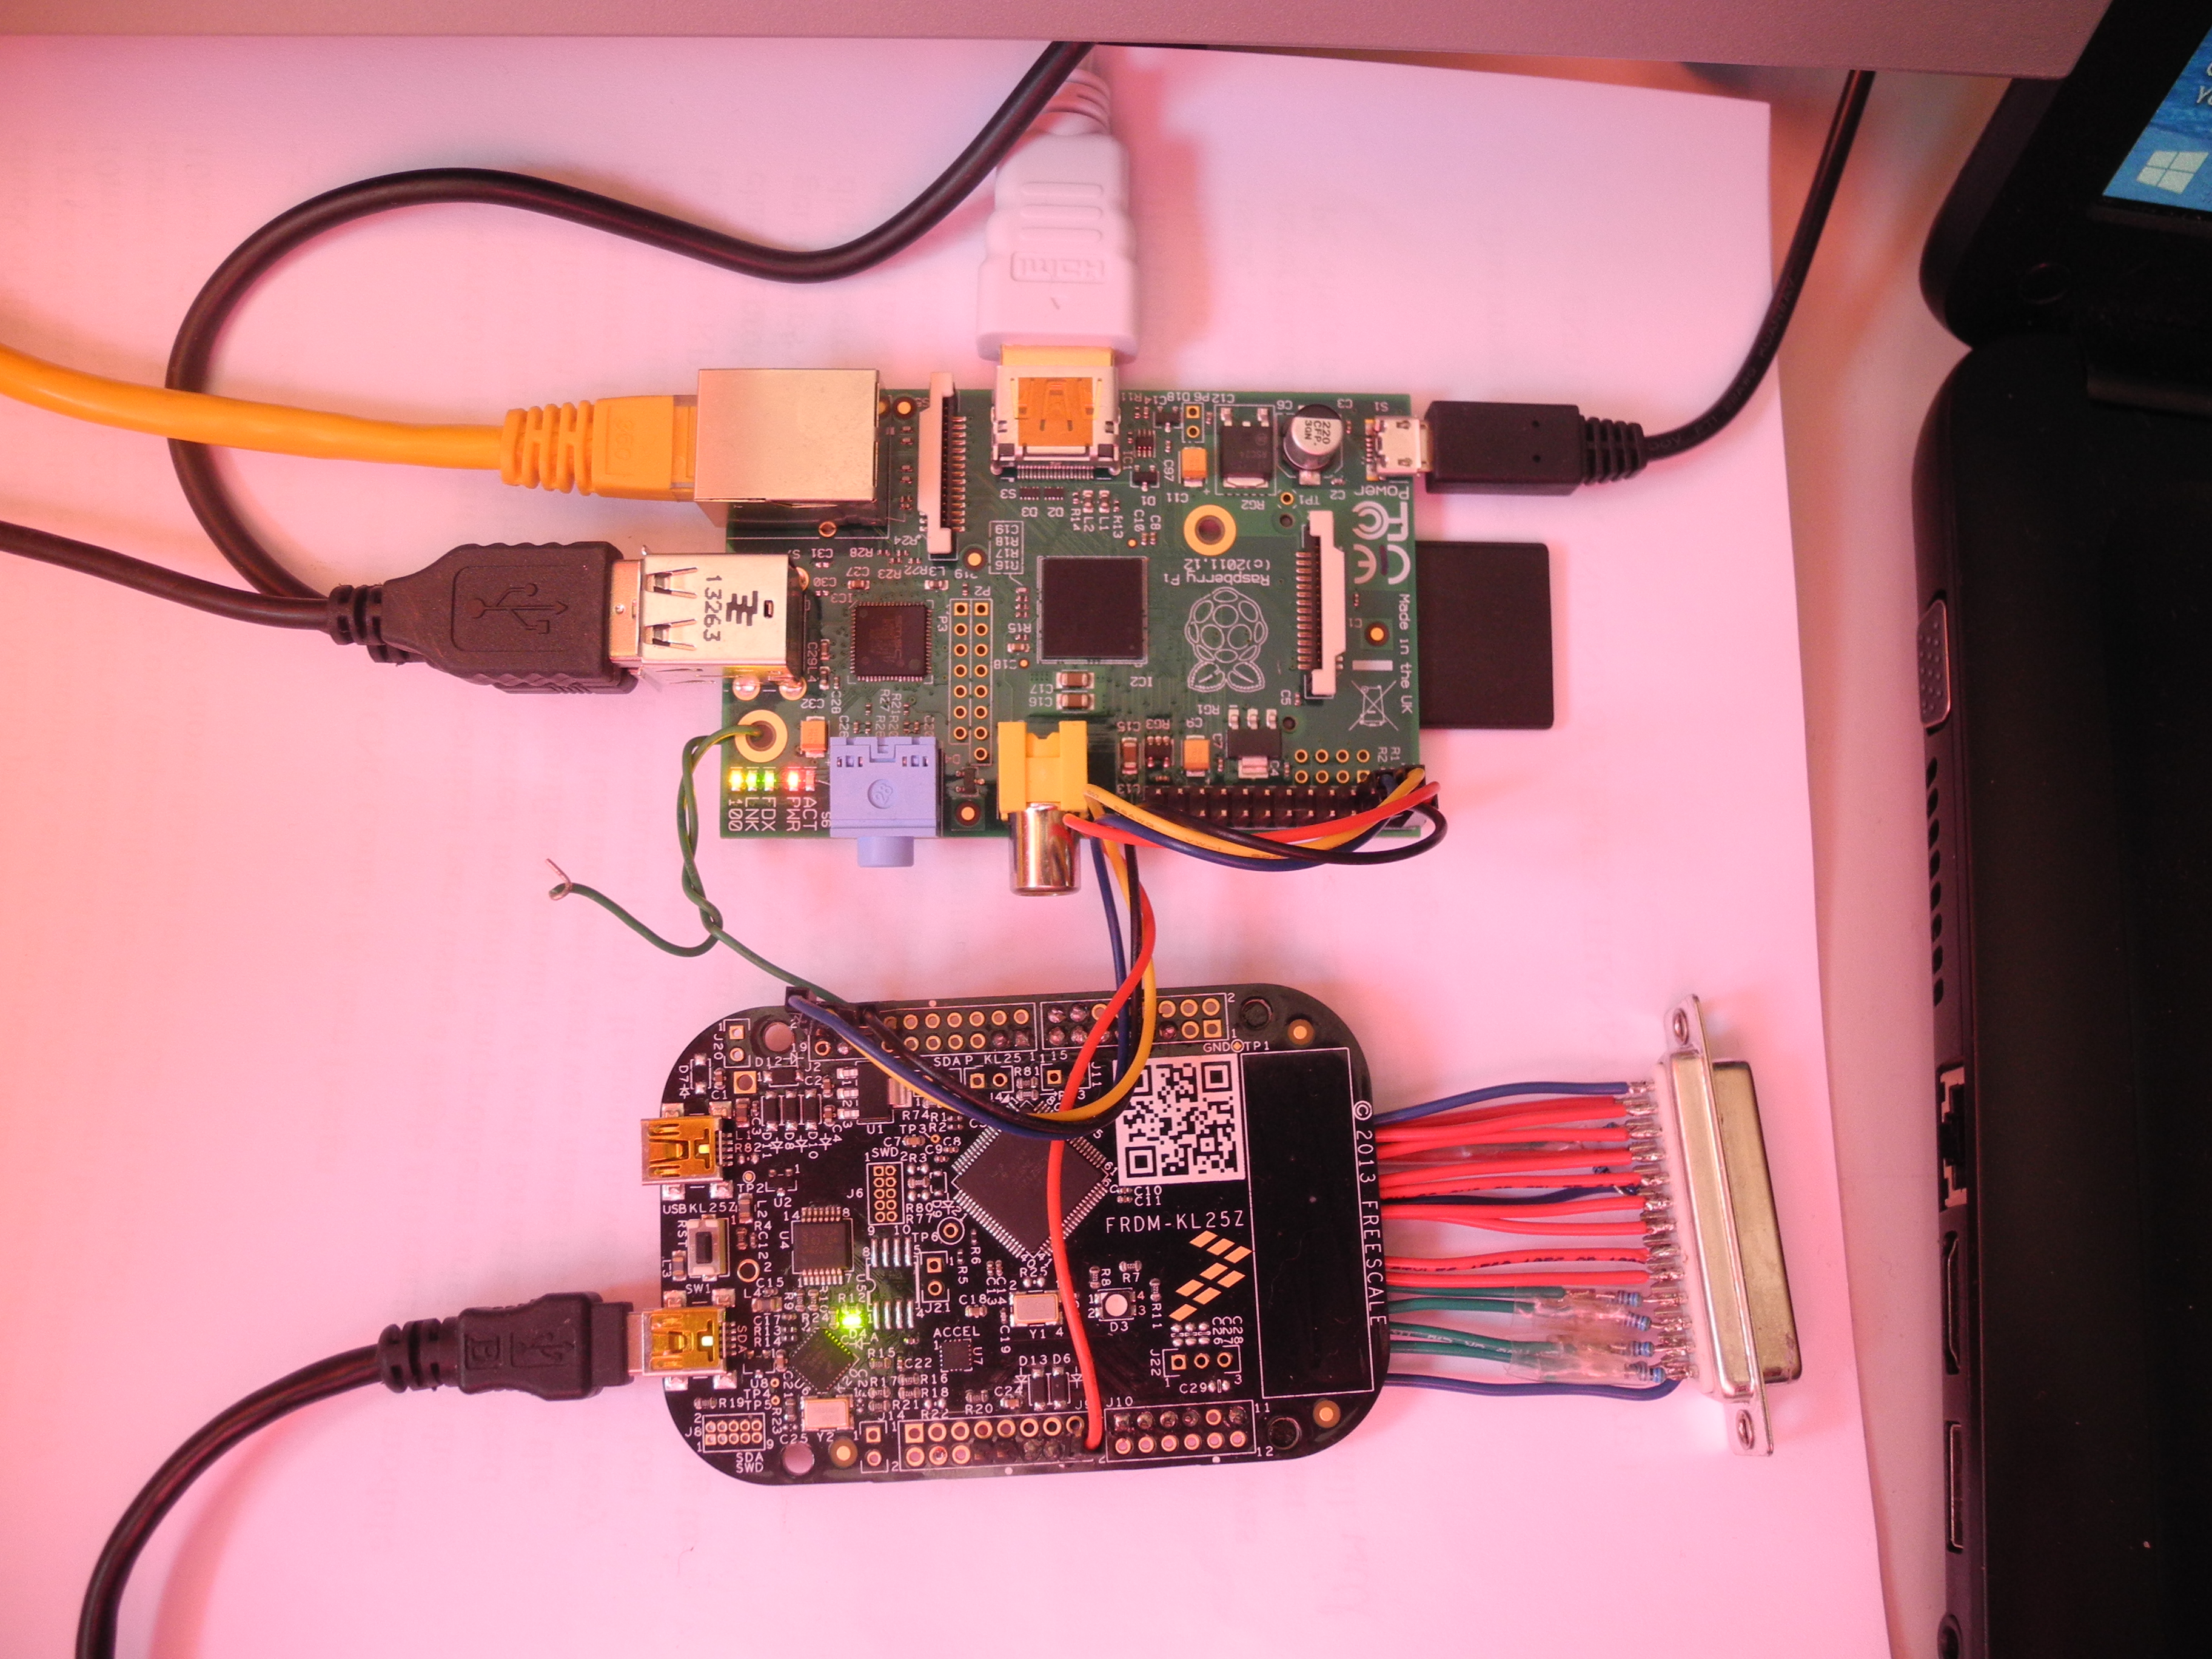
Fig 45 - Freescale Controller and LPT Port Emulator
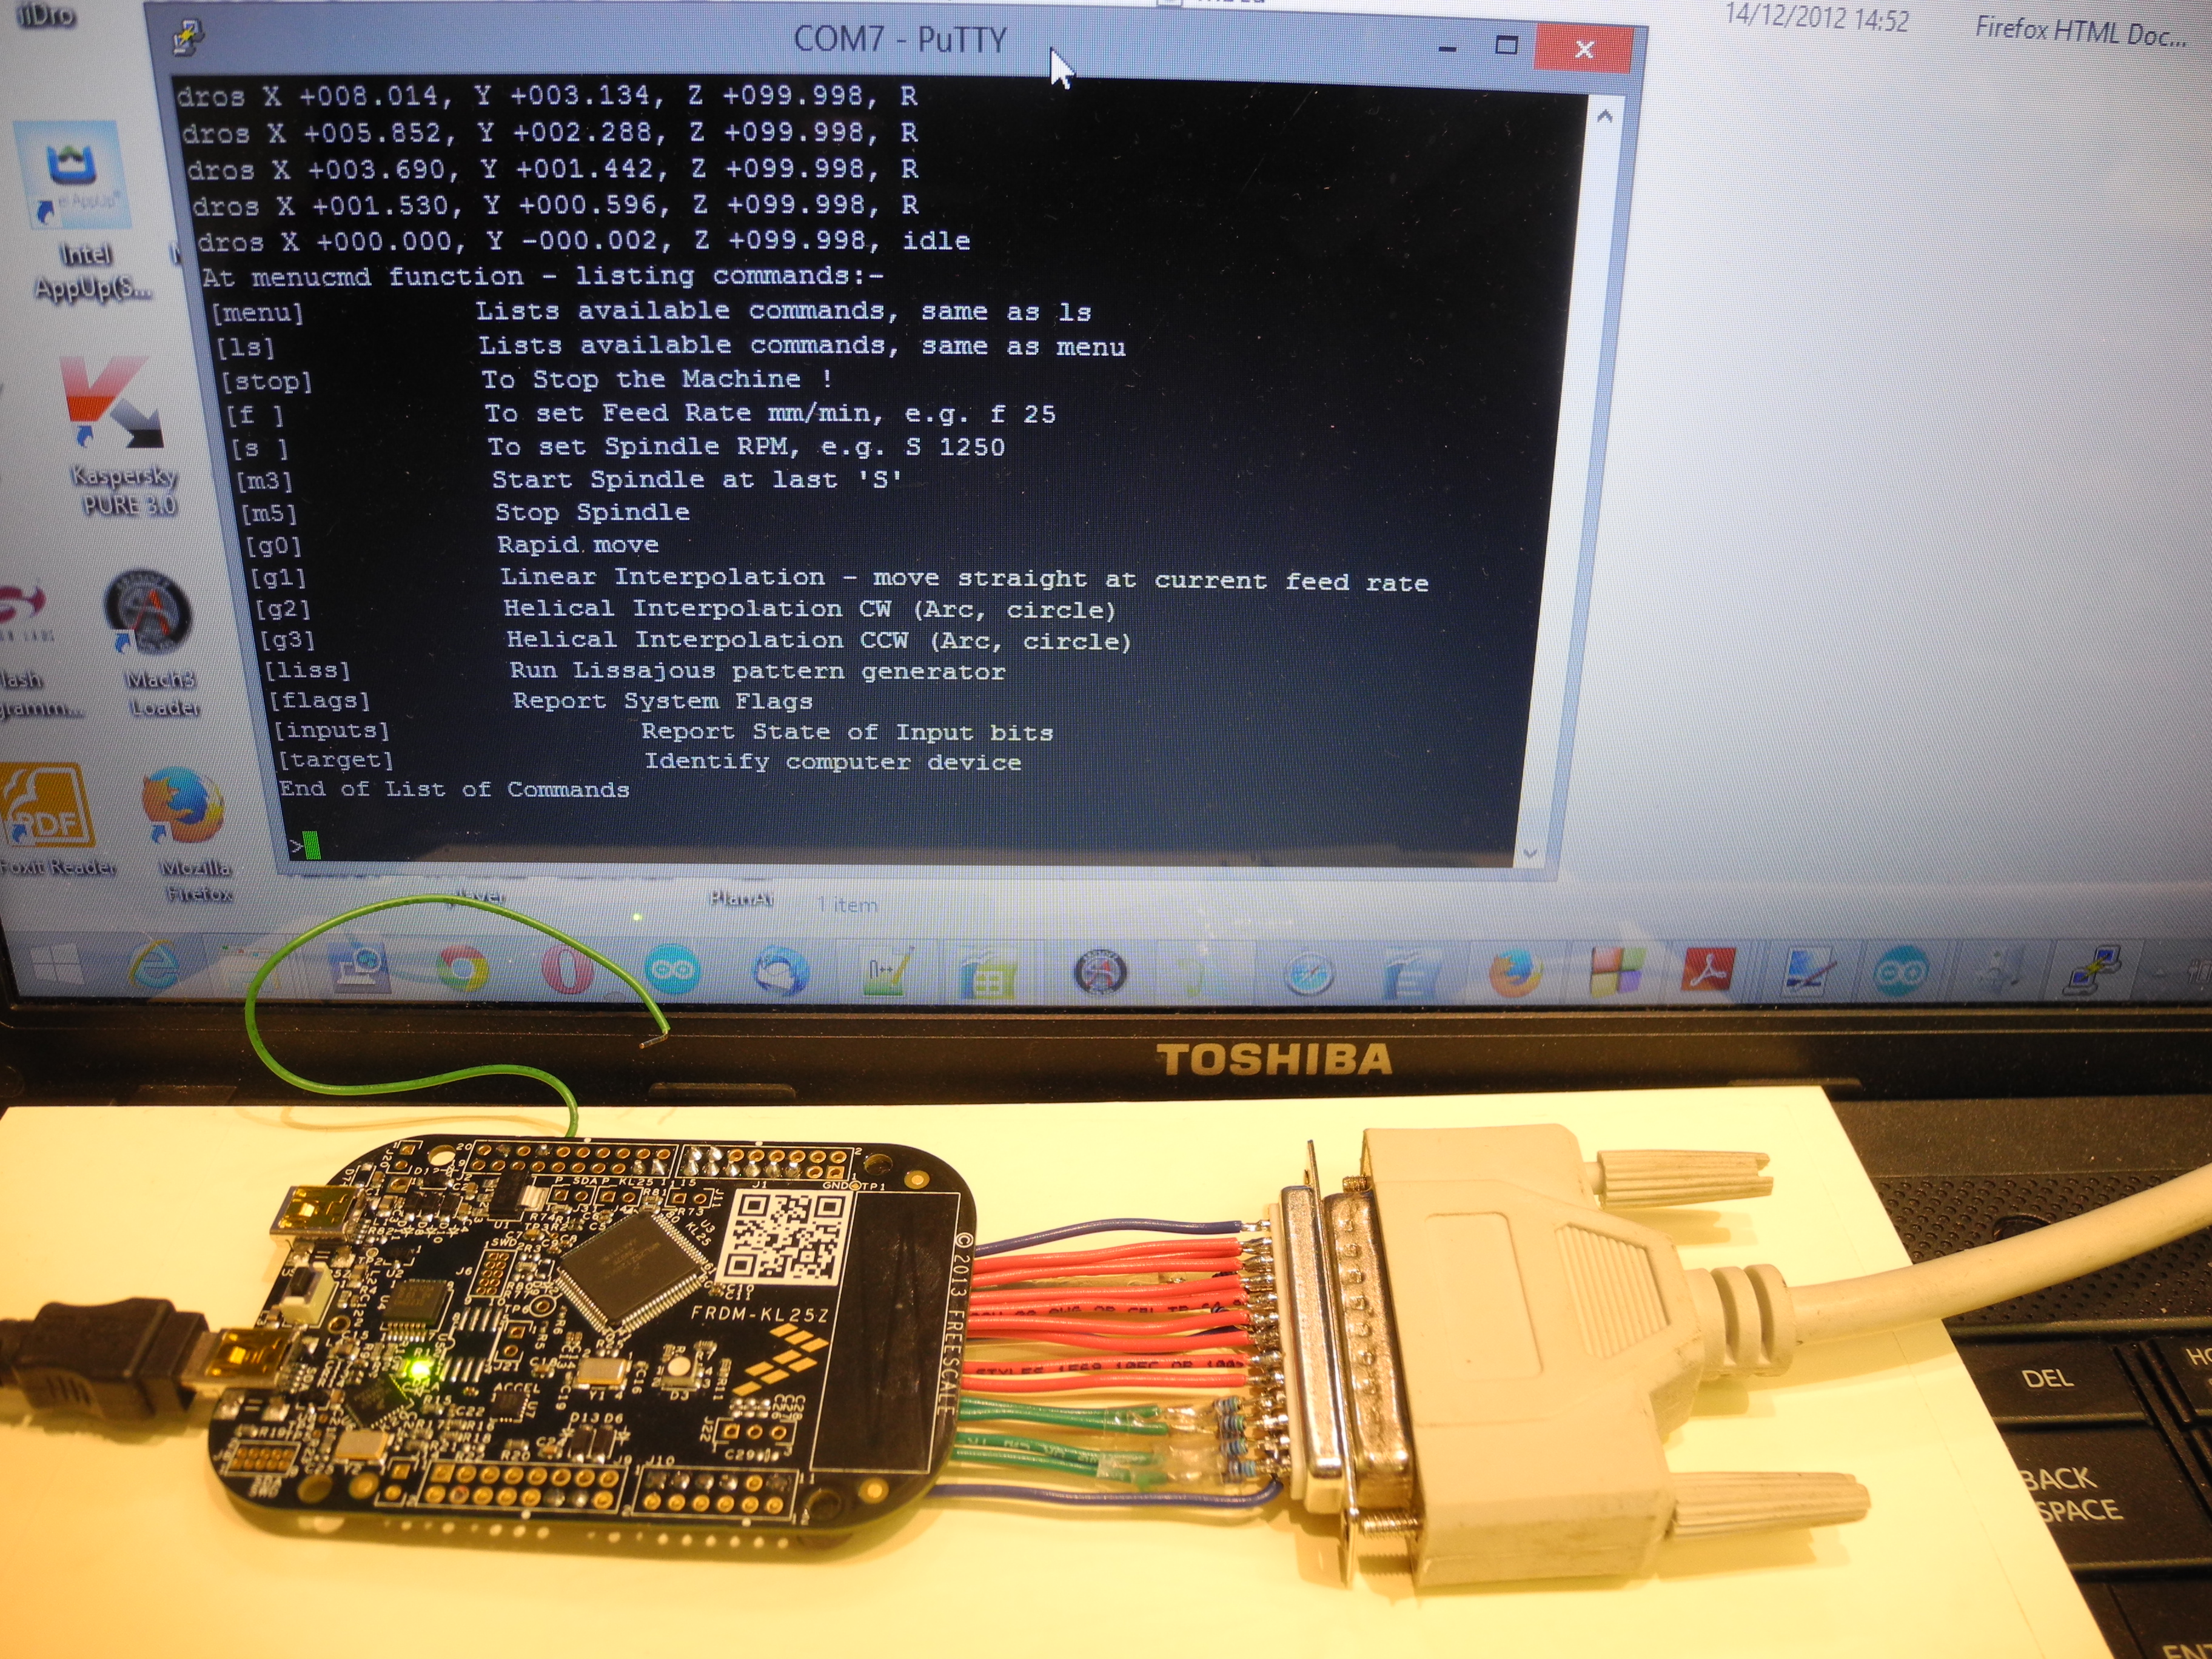
Fig 45 shows a Freescale KL46Z controller which has been wired up to a 25 pin 'D' connector to emulate the LPT port – this involved checking which pins on the 'D' connector are used as 'ground', 'input' or 'output', and wiring them to our choice of suitable connections on the KL46Z (which became an early casualty, killed by connecting to the KX3 machine which delivers 5 volts on some pins, not compatible with the 3.3 volt maximum rating of KL46 inputs!). Fig J08 shows the KL25Z controller connected to the KX3 machine and to the lap top PC via a USB lead. Just visible, resistors soldered to the connector to reduce the 5v signals from the KX3 to 3.3v so as not to wreck the KL25Z as well! The screen shows a list of the instructions understood by the controller at this point.
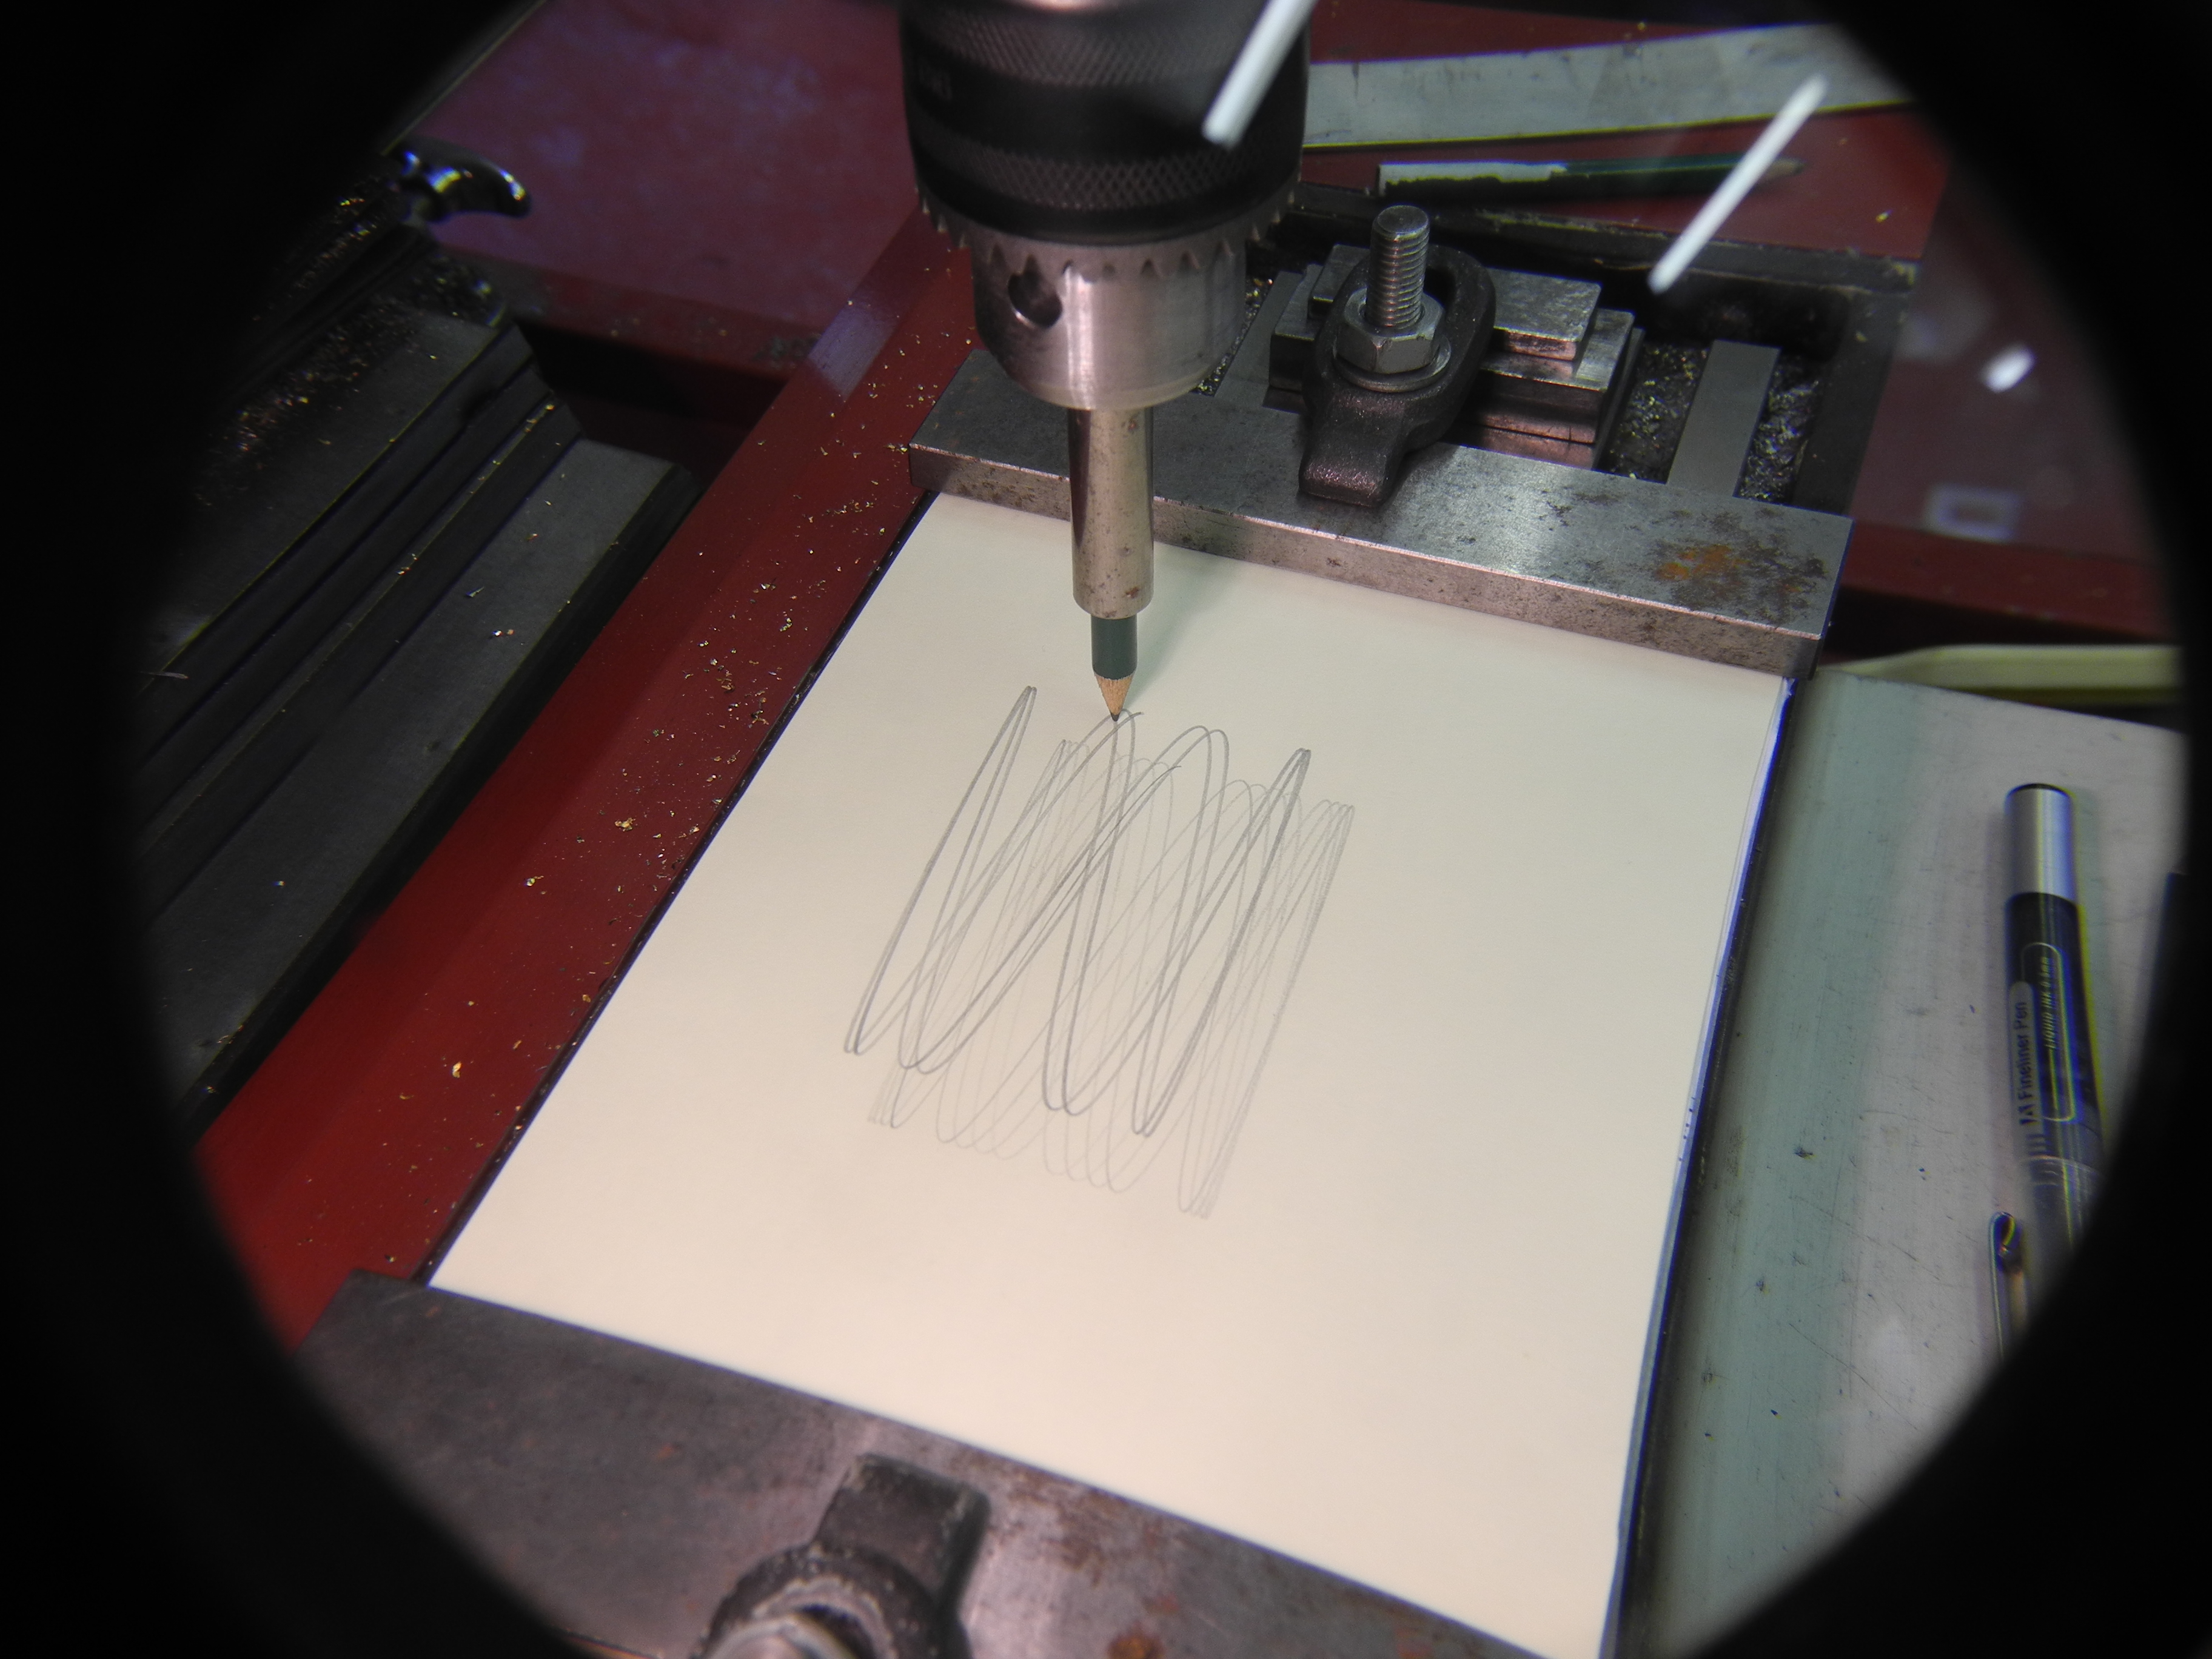
Fig 46 - Controller Connected to KX3 Mill and Laptop Fig 47 - Lissajous Mach3 Tool Path
Lissajous Pattern Testing
The next task was to create a programme both in G code to drive the KX3 using the conventional PC / Mach3 combo, and to replicate this in controller code to trace out the same non-trivial pattern. This is to prove we have succeeded in implementing a competent controller system. A Lissajous pattern was fixed upon as it provides a good pattern for little programming effort, the G code simulation in Mach3 is shown as Fig J09, and the code is on the web site. A spring-loaded pencil holder was put in the drill chuck in the KX3 and the PC / Mach3 programme was started to trace the pattern on a piece of card. At the end, the machine X and Y zero positions were moved by 10mm, then the KL25Z controller was connected to the KX3 and our controller was started to drive the KX3 tracing out (hopefully) the same pattern but displaced by 10mm in both X and Y. Fig 48 shows this run in progress. It worked!
Completing a CNC Control System Design
Implementing this much using a single controller module went well. Although this did represent a significant effort for a programmer with some experience, using Mbed libraries and some code reused from elsewhere meant it took far less time, and was far less effort than starting completely from scratch.
Fig 48 - Controller Driving KX3 Mill
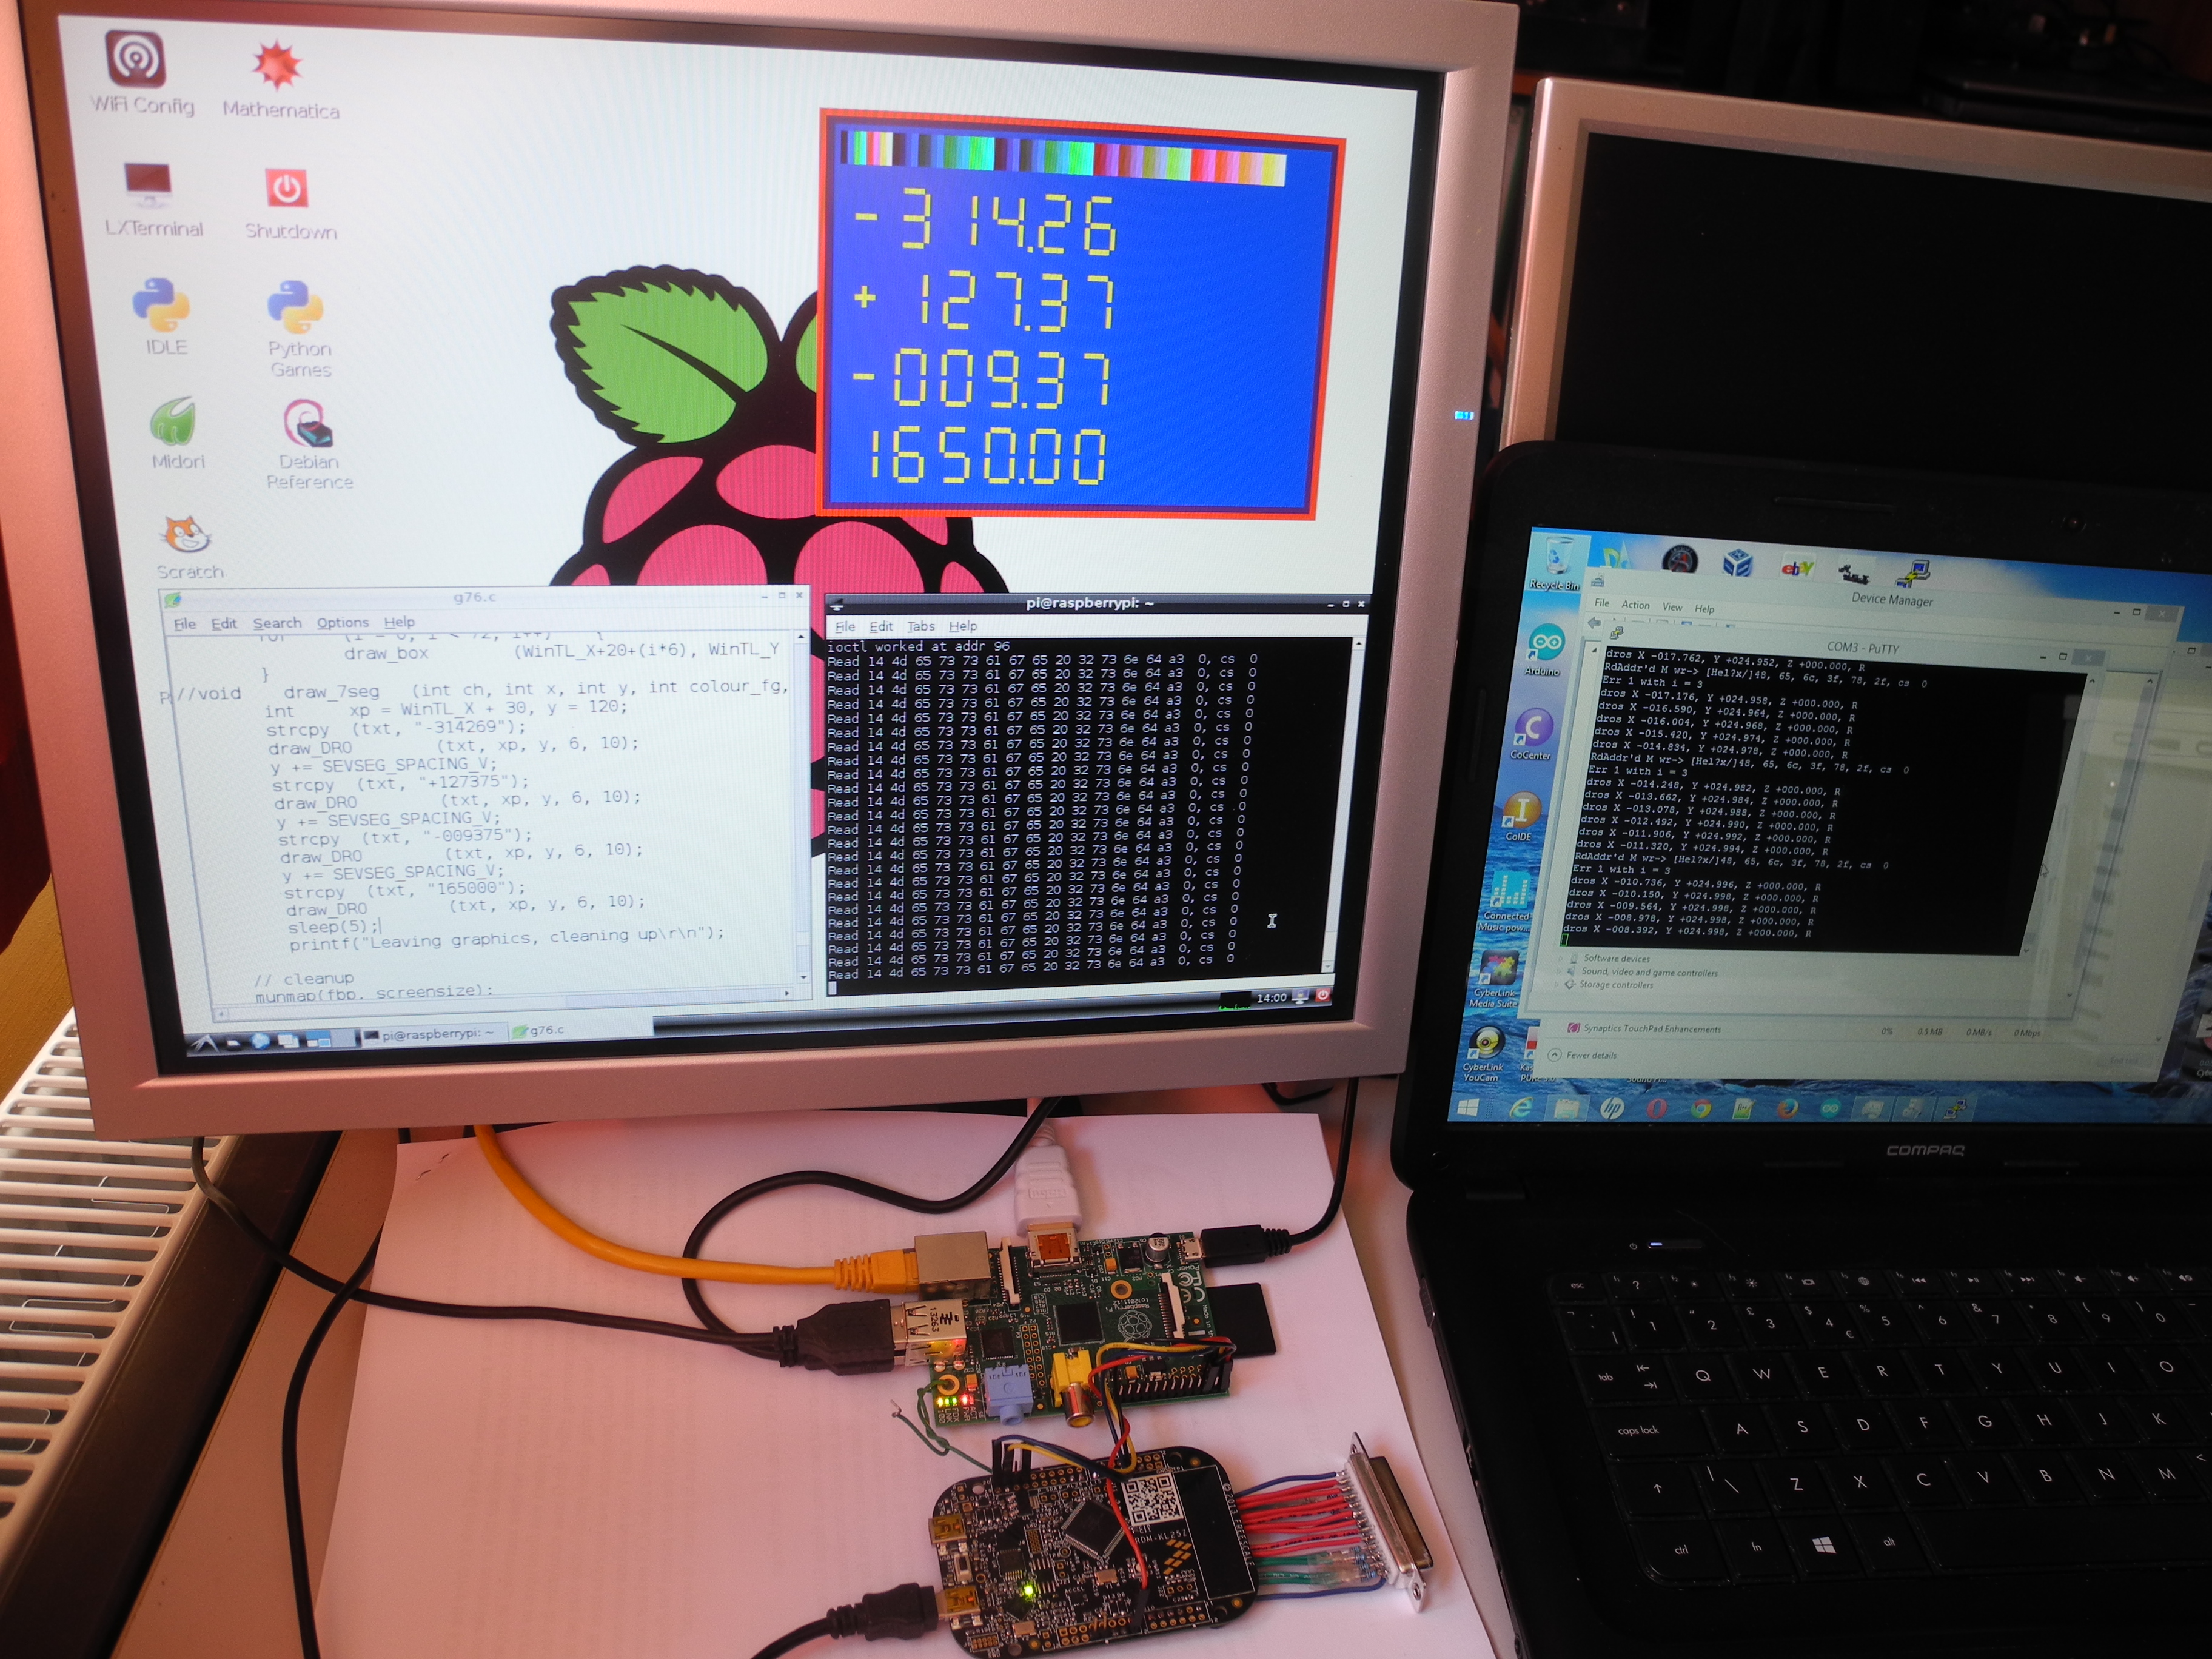
With the Engineering in Miniature print deadline fast approaching, time remained only for a little fun connecting up to a Raspberry Pi (RPi) computer. Figs 49 and 50 show the KL25Z connected to the RPi and an attempt at some 'retro looking' seven segment graphic characters. The fig shows DRO readouts for the X, Y and Z axes with the fourth line showing spindle RPM. Still very much a 'work in progress' ...
Fig 49 - Controller and RPi Communicate
This project may one day reach a point where it is 'finished', although the design objective has been achieved – Can We Design Our Own CNC Control System ? – yes. Never the intention to replicate much of Mach3, this has been more of an academic exercise. At least when the last PC with a printer port has died, the old KX3 mill will still be usable.
Fig 50 - RPi as Retro DRO
This brings our series to a close, although work continues. Playing with the RPi showed it has a place as a novelty DRO at least, but more productive may be future work with a 'BeagleBone Black' with 'LinuxCNC', a free 'Open Source' alternative to Mach3. Time will tell how easily this interfaces with our controller. As with Mach3, neither KL25Z or LPC1768 implementation can drive a 200kHz servo drive system at full speed, although all are good for any stepper motor application. NCOs capable of running more than fast enough for anything have been designed and tested in hardware using an Altera Field Programmable Gate Array (FPGA) on a 'DEO-Nano' development kit. The FPGA undoubtedly makes for a better job, however programming FPGAs is possible only after climbing a long, steep learning curve. Have a go, but you have been warned! Very much easier is programming a controller to do something useful. Designing a CNC controller may not be for beginners, but the idea started as something very simple and grew into a larger project as the sum of a number of simpler parts. Robot warriors, 'makers', and a rapidly growing number of amateur hobbyists in many fields are doing great things with Arduinos, Mbeds, RPis and other modern, programmable electronic devices. For readers wanting further information or with an interest in any of these design ideas, the author may be contacted – email jon@jons-workshop.com